
Anyhow, one of the reasons why I started this blog was because when I started to get serious about creating comics, I was shocked at how hard it was to find answers to my questions. To get where I'm at now (which, I would still describe as the beginning of a long journey) has involved a lot of trial and error, and also a lot help from people more wiser than I (you'll find that the comics community, by and large, is filled with lots of friendly helpful folks), which I'd sought out on forums and elsewhere. So in turn, I'd like to try and share what I've learned, and what I continue to learn everyday. Partially to help other people learn, and partially to get peoples opinion on what I'm doing and ways to refine/improve upon it.
Before I delve to deep into the particulars of my process, let's to a quick overview of how I work. First off, unless I'm just drawing for kicks (which is not as often as I'd like), pretty much all of my day to day artwork is 100% digital. I currently do all of my drawing in Manga Studio (I started in Photoshop, but have found Manga Studio far superior for drawing comics) on a tablet PC (Wacom Penabled, of course). So, what you're going to see here is work pretty much all done in Manga Studio.
The piece in question is a chapter lead in page for the upcoming Mastorism collection. Its a little atypical of my normal page approach. Unfortunately, this means we'll be skipping panel layouts, and all that fun stuff, but it should also simplify things. Each of the lead ins are going to feature a profile of a prominent character. The one we're looking at features the Dark Mastor.
Here we go!
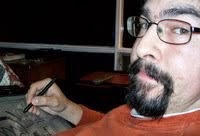
Reference Material

Pencilling


Inking

Far and away my favorite part of the process. I'm an inker at heart, I love doing line work. Sigh. Anyhow, straight forward enough, I just go over the pencils with "ink" on a separate layer. Manga Studio has a number of fantastic tools for this, I happen to favor the G pen right now. Its pressure sensitive, of course, which is how I mimic real brushed ink work.
My goal is to make my stuff look very much like something drawn traditionally. By the number of folks who think I do work traditionally, I'm guessing I'm on the right track (pat on the back for myself). I think the secret is simply approaching it the same way, really. I am a fan of old school Silver Age-y line work, so that's what comes out when I draw. If you want another good example of this, check out Endstone by my (internet) pal Anthony Theisen. Good stuff, and fantastic artwork.

Final Piece

And here's the piece completed. You'll notice I added toning to the background for some flavor. Nothing fancy, I just added a simple dot tone (might be able to see in the full size version) on yet another layer.
So there's a basic run-down of how the digital process goes. Like I said, in future posts I'll likely delve further into the nitty gritty of how to do this or that, but this ought to give you an idea of the basics. Fundamentally its not all that different from working traditionally.
If there any subjects that anyone would like me to expand on specifically, please feel free to let me know and I will see what I can do (I'm always looking for blog topic fodder, as you may have noticed).

Enjoyed the look at your process.
ReplyDeleteInteresting seeing how you work, Matt. We work very similarly actually. I like to use reference too. Lately I've been using myself as a model, just to get the shoulder shift and hands to look natural, especially on close and medium shots. Far shots I just draw from memory, mostly.
ReplyDeleteOh, and thanks for the plug. :)
Tony
Shows how frequently I keep up with the blog. I just saw your comment, Tony!
ReplyDeleteI grab refs from all sorts of spots. Lately I've been using a lot of 3d posing programs because it allows me full control over angle/pose/lighting etc, it took me quite a while to get natural looking poses out of it (and I'm still not always happy), but once I did, I felt like it really freed me up.
I've used myself from time to time, as well as some mannequins-- my only gripe with that would be that I have less control over the lighting, which lately has become more important to me than it used to.
I'd love to see inside your process, especially because we do work so similarly.
Can't wait till you heal and are back at endstone!